
How to Jumpstart a Boat: Safe & Easy Instructions
To jumpstart your boat, first wear safety gloves and goggles. Ensure the gear is off and the boat secured.
Identify and inspect the battery for damage or corrosion. Use a compatible 12-volt jump starter or donor battery.
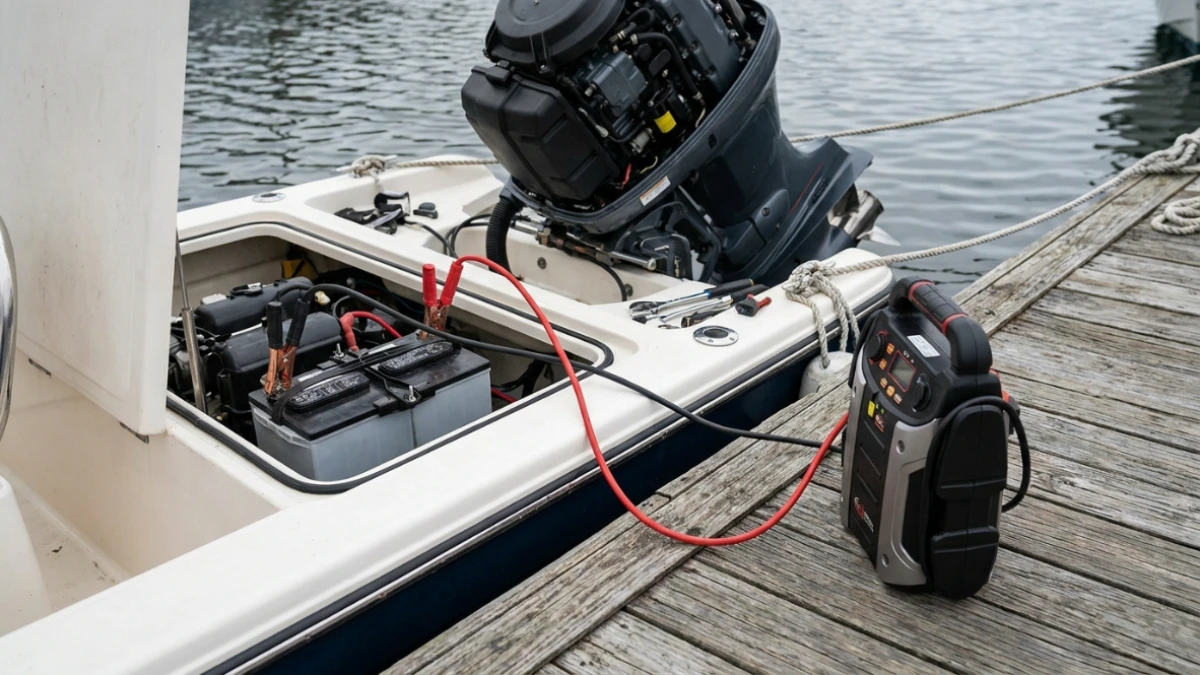
Connect cables in order: positive to the dead battery, positive to the donor, negative to the donor, and negative to the engine ground—not the dead battery.
Start the donor, then your boat. Remove cables in reverse order. Keep the engine running to recharge.
Following this method prevents damage and ensures success. Learn how to handle issues and proper care next.
Key Takeaways
- Wear safety gloves and goggles, remove jewelry, and ensure the boat is secured before starting the jumpstart process.
- Identify battery terminals, inspect for corrosion or damage, and confirm jumper cables and jump starter compatibility.
- Connect clamps in order: red positive to dead battery, red positive to live battery, black negative to live battery, then black negative to engine ground.
- Start donor engine, let it idle for several minutes, then attempt to start the stalled engine with short cranking intervals.
- Remove cables in reverse order after starting, keep engine running for 20-30 minutes to recharge battery, and consider additional charging if needed.
Safety Gear and Initial Checks Before Jumpstarting a Boat
Before you start jumpstarting your boat, always wear safety gloves and goggles to protect yourself from sparks and battery acid.
Next, make sure the boat’s transmission is in neutral to prevent unintended movement during the procedure.
Power down all electronic devices onboard to minimize the risk of power surges that could damage sensitive components.
Inspect the battery thoroughly for any visible damage, leaks, or corrosion.
If corrosion is present on the terminals, clean it off using a wire brush to guarantee a good electrical connection.
These initial checks are critical to maintaining safety and ensuring a successful jumpstart, protecting both you and your boat’s electrical system from potential hazards before you proceed with connecting jumper cables.
Additionally, keeping your boat stored in a cool, dry environment with proper ventilation can help prevent battery and electrical issues over time.
Identifying and Preparing a Dead Boat Battery
First things first, take a good look at the battery. You’ll want to check for any cracks, leaks, or signs of corrosion, as these can really mess with performance and safety.
If you spot any corrosion on the terminals, don’t worry! Just grab a wire brush and clean those up nicely.
This step is super important because it ensures a solid connection, which means fewer starting issues down the road.
Also, regularly inspecting and maintaining battery terminals helps prevent voltage drops that can cause starting problems.
Battery Condition Inspection
Regularly inspecting your boat’s battery condition is essential to accurately identify a dead or failing battery and prepare it properly for jumpstarting.
Begin by visually examining the battery for physical damage, leaks, or swelling, which signal internal failure.
Check the terminals for corrosion or buildup, as this can impede electrical flow.
Use a multimeter to measure voltage; a fully charged 12-volt battery should read around 12.6 volts.
If it reads below 12.4 volts, the battery is partially discharged.
Below 12 volts often indicates a dead battery needing a jumpstart or recharge.
Confirm that the battery case is securely mounted and that cable connections are tight.
Avoid connecting jump leads if you spot cracks or acid leaks, as this poses safety hazards and suggests battery replacement is necessary.
Ensuring your battery is within the recommended operating temperature range can help maintain optimal battery life and performance.
Terminal Cleaning Procedure
Inspect the battery terminals closely for corrosion, dirt, or buildup. These can markedly hinder electrical conductivity and prevent a successful jumpstart.
To prepare a dead boat battery, follow these steps:
- Wear safety gloves and goggles to protect against acid and sparks.
- Use a wire brush or battery terminal cleaner to remove corrosion and buildup thoroughly.
- Wipe terminals and clamps with a clean, dry cloth to eliminate moisture and debris.
- Apply a thin layer of dielectric grease to terminals to prevent future corrosion.
Proper cleaning guarantees peak contact between cables and terminals, maximizing current flow during jumpstarting. Skipping this step can cause poor connections, leading to failure or damage.
Always inspect and clean terminals before proceeding with cable connections. This attention to sensitivity and control in maintenance is similar to the precision required in euro nymph fishing techniques.
Picking the Right Boat Battery Jump Starter
Selecting the right boat battery jump starter requires understanding your battery’s specifications and the jump starter’s capacity.
First, identify your battery type: lead-acid, AGM, or lithium, as compatibility varies.
Check the battery’s cold cranking amps (CCA) rating and choose a jump starter with a peak current rating at least equal to or greater than your battery’s CCA.
Make certain the jump starter operates at 12 volts to match standard marine batteries.
Look for features like overcurrent protection, reverse polarity alarms, and a fully charged internal battery indicated by a green LED or ready light.
Also, verify the jump starter’s clamp quality and cable length for secure and effective terminal contact.
Prioritize portability and durability for marine environments to guarantee reliable performance when you need it most.
For boats requiring higher power, understanding the benefits of 12V versus 24V systems can help determine the appropriate jump starter and battery setup.
Correct Cable Connection for Jumpstarting a Boat
Once you’ve chosen a jump starter compatible with your boat’s battery, the next step is to connect the cables correctly to guarantee safe and effective power transfer.
Follow these critical steps to make certain proper connection:
- Attach the red positive clamp to the positive terminal of the dead battery first. Then connect the other red clamp to the positive terminal of the live battery.
- Connect the black negative clamp to the negative terminal of the live battery.
- Attach the remaining black clamp to an unpainted metal ground on the engine block, not the dead battery’s negative terminal.
- Double-check clamp contacts for security and make certain the jump starter is fully charged before proceeding.
Correct cable connection minimizes risk and maximizes jumpstarting success. For added safety, ensure all clamps are secured firmly to prevent any movement during the process, as advised in secure connection guidelines.
Avoid Connecting Negative Clamp to Dead Battery Terminal
Although it might seem intuitive to connect the black negative clamp directly to the dead battery’s negative terminal, you should avoid doing so to prevent sparks and possible battery damage.
Instead, attach the negative clamp to an unpainted metal surface on the engine block or boat chassis away from the battery. This grounded connection reduces the risk of igniting hydrogen gas emitted by the battery during jumpstarting.
Make sure the metal surface is clean and free of paint, rust, or grease to guarantee a solid electrical connection. Avoid touching the clamp to any moving parts or fuel lines.
This practice enhances safety by minimizing spark buildup near the battery, protecting both you and your boat’s electrical system during the jumpstart process.
For added safety, regularly inspect the battery terminals and connectors to detect any early signs of damage that could affect the jumpstarting process.
Starting the Donor Engine for Jumpstarting
After securing the negative clamp to a clean, unpainted metal surface on the engine block, the next step is to start the donor engine. This powers the live battery to supply the necessary charge.
Follow these precise steps:
- Start the donor engine and let it idle steadily.
- Allow the engine to run for several minutes to deliver initial charge.
- If the dead battery is deeply discharged, wait about two minutes before attempting to start the stalled boat engine.
- Attempt to start the stalled engine, limiting cranking to five seconds to avoid damage.
Using a portable fish finder can help monitor battery health and ensure safe jumpstarting practices on small watercraft.
Removing Jumper Cables Safely After Start
Once your boat’s engine is running, it’s time to remove the jumper cables, but you want to do this carefully to avoid any sparks or damage. So, let’s go step by step.
First, start by detaching the black clamp from the engine block ground. After that, move on to the live battery’s negative terminal. It’s really important to follow this order to keep everything safe.
Once you’ve got all the clamps off, take a moment to wipe down the terminals and clamps with a dry cloth. This helps ensure that everything stays clean and free from corrosion. Keeping those connections nice and tidy will help your battery and engine run smoothly!
Correct Cable Removal Order
Because improper removal of jumper cables can cause sparks or damage, you need to follow the correct cable removal order carefully after the boat engine starts. This guarantees safety and protects the electrical system.
Remove the cables in this sequence:
- Detach the black negative clamp from the grounded metal surface on the engine block first.
- Remove the black negative clamp from the negative terminal of the live battery.
- Take off the red positive clamp from the positive terminal of the live battery.
- Finally, remove the red positive clamp from the positive terminal of the dead battery.
Always handle clamps firmly and avoid contact between clamps during removal. This procedure minimizes the risk of short circuits and protects both batteries.
Post-Removal Terminal Care
Following the proper cable removal order reduces the risk of sparks. You still need to care for the battery terminals and clamps immediately after to guarantee safety and maintain electrical integrity.
First, wipe down each terminal and clamp with a dry cloth to remove any residual acid or corrosion that could cause future connectivity issues. Inspect terminals for damage or corrosion; if present, clean with a wire brush once the battery is disconnected.
Avoid touching terminals simultaneously to prevent short circuits. Store jumper cables properly, ensuring clamps are free from dirt or moisture.
Finally, monitor the battery voltage with a multimeter after the jumpstart to confirm it holds charge. Taking these steps prevents electrical faults and extends battery and cable lifespan. Applying corrosion-resistant coatings can further protect terminals from environmental damage and prolong their usability.
Post-Start Procedures and Recharging Your Boat Battery
Maintaining your boat battery’s charge after a successful jumpstart is essential to guarantee reliable engine performance.
Once the engine starts, keep it running at elevated RPM for 20 to 30 minutes to allow the alternator to recharge the battery effectively.
Follow these steps to ensure proper post-start care:
- Run the engine continuously for at least 15 minutes to restore battery charge.
- Monitor the battery voltage with a multimeter if you suspect insufficient charging.
- Use a portable battery charger for an additional boost if the battery doesn’t hold charge.
- Avoid turning off the engine immediately after starting to prevent battery drainage.
These measures will help restore your battery’s capacity and prevent future starting issues on the water. Additionally, using deep-cycle marine batteries can improve stable power delivery and overall battery life in marine environments.
Monitoring Your Boat Battery After Jumpstarting
Regularly monitoring your boat battery after jumpstarting guarantees you catch any issues early and maintain reliable power.
Begin by visually inspecting the battery terminals for corrosion or loose connections, which can impede charging.
Use a multimeter to measure voltage; a fully charged 12-volt battery should read around 12.6 volts at rest.
A fully charged 12-volt battery typically shows about 12.6 volts when measured at rest.
While the engine runs, verify the alternator output; voltage should rise to approximately 13.5–14.5 volts, indicating proper charging.
Pay attention to any signs of swelling, leaks, or unusual heat, which signal battery distress.
If the voltage drops below 12 volts after engine shutdown or you notice erratic instrument readings, plan for a thorough battery test or replacement.
Consistent monitoring guarantees your battery stays reliable and prevents unexpected power failures on the water.
Troubleshooting Jumpstarting Issues on Boats
Encountering issues during a boat jumpstart can be frustrating. Understanding common problems and their solutions helps you address them efficiently.
First, verify all cable connections follow the correct sequence. A reversed clamp can prevent current flow.
Second, check for corrosion or loose clamps that reduce conductivity. Clean and tighten terminals as needed.
Third, make certain the donor battery or jump starter is fully charged and compatible with your boat’s battery type.
Fourth, if the engine won’t crank, wait two minutes to let the donor battery charge the dead one before trying again. Limit cranking to five seconds per attempt to avoid damage.
Following these steps guarantees you troubleshoot effectively, preventing damage and increasing your chances of a successful jumpstart.
Frequently Asked Questions
Can I Jumpstart a Boat Battery in Wet or Rainy Conditions?
You can jumpstart a boat battery in wet or rainy conditions, but you must take extra precautions.
Always wear insulated gloves and goggles to protect yourself from sparks and acid.
Make certain cables and terminals stay dry and avoid standing in water while working.
Position yourself to prevent slipping and double-check connections for secure contact.
If conditions are too hazardous, wait for drier weather to avoid electrical shock or accidents.
How Often Should Boat Batteries Be Jumpstarted to Maintain Health?
Think of your boat battery like a heart. You don’t want to shock it into action too often.
You should only jumpstart it when absolutely necessary, not as a routine fix. Frequent jumpstarting signals underlying issues like poor charging or battery age.
Instead, regularly maintain your battery by charging it fully after use and testing its health. This proactive care keeps your battery’s pulse strong and prevents premature failure.
Are There Specific Brands of Jump Starters Recommended for Marine Use?
You should consider brands like NOCO Genius, DBPOWER, and Clore Automotive for marine jump starters.
These brands offer models designed to withstand harsh marine environments with waterproof or water-resistant features.
They provide reliable 12-volt power output, compatibility with marine batteries, and safety protections against sparks and reverse polarity.
Always verify the jump starter’s amperage matches your battery’s requirements and make certain it has corrosion-resistant clamps suitable for saltwater exposure.
Can I Use a Car Jump Starter for My Boat Battery?
Yes, you can use a car jump starter for your boat battery if it matches the battery voltage, typically 12 volts.
Make certain the jump starter is fully charged and designed for marine environments or sealed batteries to prevent damage.
Always verify clamp connections and avoid sparks.
Using a marine-specific jump starter is safer, but a quality car jump starter with proper precautions works effectively for most boat batteries.
What Precautions Are Needed for Lithium-Ion Boat Batteries During Jumpstarting?
Think of lithium-ion batteries as delicate dancers. Handle them gently. You’ll want to wear insulated gloves and goggles to shield yourself from unexpected sparks.
Avoid direct negative terminal connections. Instead, ground the black clamp to the engine block’s unpainted metal.
Use a compatible jump starter designed for lithium-ion chemistry, and confirm it’s fully charged.
Never rush; connect cables in the correct order, monitor temperature closely, and avoid over-cranking to prevent battery damage.
Bring Your Boat Battery Back to Life With Confidence
Jumpstarting your boat is like reigniting a dormant engine’s heartbeat. Precision and care are your twin oars.
By following safety protocols, selecting the right equipment, and connecting cables correctly, you guarantee a smooth surge of life back into your vessel’s power source.
After ignition, monitor and recharge diligently to keep your battery’s pulse steady.
With these practical steps, you’ll navigate the waters confidently, turning a dead battery into a reliable ally once more.