Can You Remove Studs From Wading Boots: Apply 8 Steps Before Fishing
Fly fishing wading boots can be equipped with studs to provide anglers with enhanced traction and stability while navigating various fishing terrains. But, there are situations where the need for studs changes, prompting anglers to consider their removal. Now you might think can you remove studs from wading boots?
You can remove the studs from your wading boots with relative ease. With proper planning, a few tools, and the right instructions, you can ensure your fishing experience is as comfortable as possible.
Here, we’ll explain to you how to remove studs from your wading boots to improve your traction on slippery surfaces. So, let’s get started and make your fly fishing experience safer and more enjoyable.
How Can You Remove Studs from Wading Boots
If you want to remove studs from your wading boots, there are a few steps you can follow. Here are a few:
- Step 1: Preparation
- Step 2: Identify the studs
- Step 3: Secure the stud
- Step 4: Turn counterclockwise
- Step 5: Remove the stud
- Step 6: Repeat for other studs
- Step 7: Inspection
- Step 8: Store or replace studs
Let’s go into more detail about each step.
Step 1: Preparation
First, make sure you have all the necessary tools and materials within easy reach for preparing to remove the studs from your wading boots. You will need a pair of vice grips or a 1/4′ socket wrench to accomplish this task.
Having a comfortable and well-lit workspace is also crucial to ensure a smooth process. Lay out all the tools and materials on a clean surface, ensuring they are easily accessible. This will save you time and effort as you won’t have to search for anything while working on removing the studs.
Additionally, having a well-organized workspace will help prevent any accidents or mishaps. So, take a moment to gather everything you need before moving on to the next step.
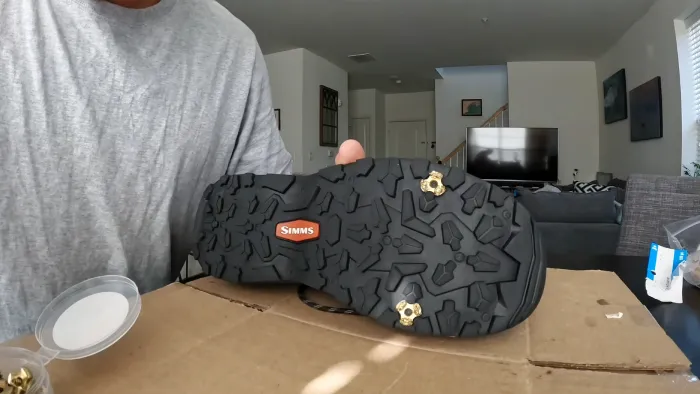
Step 2: Identify the Studs
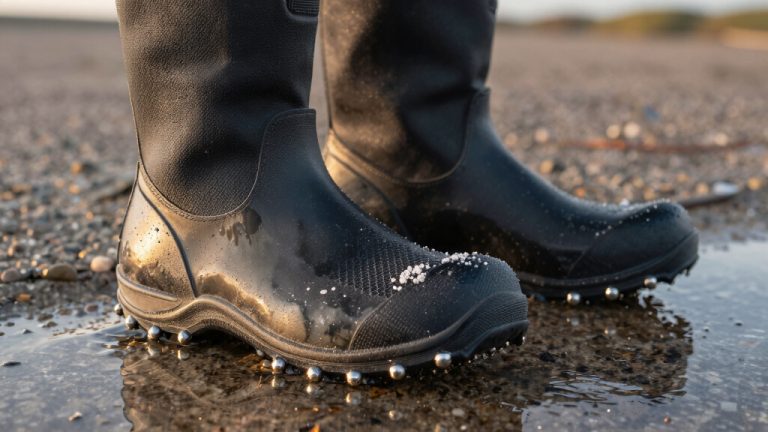
To identify the studs, carefully inspect the sole of your fishing wading boots and locate the small metal spikes or screws embedded in them. These studs are designed to give you better traction while wading in slippery conditions.
Look closely at the bottom of your boots and run your fingers over the surface to feel for any protrusions. The studs may be evenly distributed across the sole or concentrated in specific areas, depending on the brand and model of your boots.
Pay attention to any worn or damaged studs that need replacing. It is important to identify the studs before removing them to ensure that you remove the correct ones and maintain the desired level of traction when you’re out on the water.
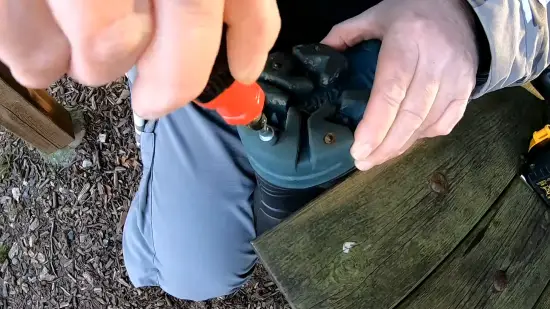
Step 3: Secure the Stud
Once you’ve identified the studs, use a 1/4′ socket wrench or a pair of vice grips to grip the stud securely. It is important to have a firm grip on the stud to ensure it can be removed without causing any damage.
If the studs are stubborn or tightly screwed in, using vice grips will provide a better grip and make the removal process easier. Simply position the vice grips around the stud and tighten them securely.
If you prefer to use a socket wrench, make sure it is the appropriate size for the stud. Slide the socket wrench over the stud and turn it counterclockwise to loosen and remove it. Remember to apply steady pressure and avoid excessive force to prevent any accidents or damage.
Step 4: Turn Counterclockwise
As you turn the stud counterclockwise, apply steady and even pressure to avoid stripping the threads. This is an important step in removing studs from your fishing wading boots.
By turning the stud counterclockwise, you are loosening it from the sole of the boot. It is crucial to use gentle pressure and avoid excessive force, as this could potentially damage the stud or the boot.
Applying steady and even pressure will help ensure a smooth removal process. If the stud is resistant and difficult to turn, taking your time and avoiding using excessive force is advisable. Remember, patience is key when removing studs from your wading boots.
Step 5: Remove the Stud
After fully loosening the stud from the sole of the boot, unscrew it with your fingers. Grip the stud firmly between your thumb and index finger and turn it counterclockwise. As you twist, the stud becomes looser and easier to remove.
Continue unscrewing until the stud is completely detached from the boot. Be careful not to force it or use excessive pressure, as this could damage the threads or the sole of the boot.
If the stud is stubborn and won’t come out, you can try using a pair of pliers or a stud removal tool for added leverage.
Once the stud is removed, you can repeat these steps for any other studs you wish to remove from your wading boots.
Step 6: Repeat for Other Studs
To remove the remaining studs, repeat the process for each stud until they are all detached from the sole of the boot.
Start by locating the next stud that needs to be removed. Use the same tools and techniques as before to loosen and unscrew the stud from the sole. Remember to apply steady pressure and rotate counterclockwise until the stud comes loose.
Once the stud is fully removed, set it aside and move on to the next stud. Repeat this process for each remaining stud on your wading boots. Take your time and be careful not to damage the sole or any other part of the boot.
With each stud successfully removed, you’ll soon have a pair of wading boots ready for your next fishing adventure.
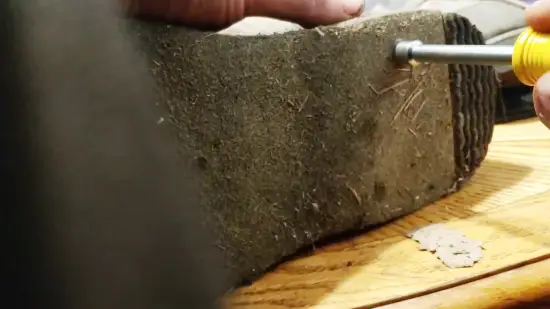
Step 7: Inspection
Check the holes in the boot’s sole for any remnants of the studs and ensure they are clean and free of sharp edges or debris. This step is crucial to ensure the safety and functionality of your wading boots.
Leftover studs or sharp edges can cause discomfort and potentially lead to injury while wading. Begin by inspecting each hole individually, using a small brush or toothpick to remove any debris that may have accumulated.
Inspect thoroughly, as even small remnants can affect the boot’s performance. After removing any debris, run your finger along the inside of the hole to check for any sharp edges. If you detect any, use a fine-grit sandpaper or file to smooth them out.
Step 8: Store or Replace Studs
If you plan on reusing the studs, store them in a safe place for future use. Storing the studs properly ensures they remain in good condition and are ready for your next fishing adventure.
After removing the studs from your wading boots, clean them thoroughly to remove any dirt or debris. Then, dry them completely to prevent rusting or corrosion.
It is recommended to store the studs in a small container or bag, making sure they are kept away from moisture and extreme temperatures. This will help prolong their lifespan and maintain their effectiveness when you decide to use them again.
When Should You Remove Studs from Fly Fishing Wading Boots
If you’re considering removing studs from your fly fishing wading boots, there are several factors to take into account:
- Changing fishing conditions
- Boat or deck safety
- Storage and travel
- Indoor and urban use
- Extended boot lifespan
Here are some tips for when you should remove studs from your wading boots:
1. Changing Fishing Conditions
When you’re facing changing fishing conditions, removing studs from your wading boots may be necessary to adapt to the new terrain. Different fishing environments require different types of traction.
For instance, if you’re moving from a rocky riverbed to a sandy shore, the studs on your boots may not be needed and can actually become uncomfortable. Removing the studs will give your boots a flatter sole, providing better comfort and flexibility on softer or sandy bottoms.
2. Boat or Deck Safety
Studded boots can pose a safety hazard on boat decks and cause potential injuries to yourself and others. When you transition from fishing on the water to being on a boat or a fishing deck, the studs on your boots can damage the deck and create a slippery surface. This can lead to accidents and falls, resulting in serious injuries.
To prevent this, removing the studs before boarding the boat is recommended. Doing so eliminates the risk of damaging the deck and reduces the chances of slipping. It’s important to prioritize safety for yourself and others who may be on the boat with you.
3. Storage and Travel
When wading boots with studs, it is important to consider how you store and pack them. As mentioned earlier, studs can sometimes catch on other gear or items, leading to damage.
To prevent this, it is recommended that you remove the studs before storing or traveling with your boots. This protects the studs themselves and prevents any potential harm to your other equipment.
Taking a few moments to remove the studs can save you from any unnecessary frustration or expenses. So, before stowing away your wading boots, remember to remove those studs for a hassle-free storage and travel experience.
4. Indoor and Urban Use
If you’re fishing in indoor or urban environments, it’s important to be mindful of the potential damage that studded boots can cause. While these boots are great for providing traction on slippery surfaces in outdoor settings, they can wreak havoc on delicate indoor surfaces like wooden floors or tiled surfaces.
The metal studs on the bottom of the boots can leave scratches and dents, which can be costly to repair. Also, studded boots can be noisy and disruptive to others around you in urban settings.
To avoid causing damage or inconvenience, removing the studs from your wading boots before venturing into indoor or urban areas is best. Most wading boots come with removable studs, making switching between outdoor and indoor use easy.
5. Extended Boot Lifespan
To prolong the lifespan of your boots, consider preserving their quality by removing the studs when they are not needed. While studded boots provide excellent traction on slippery surfaces, using them unnecessarily can lead to faster wear and tear.
When you’re not wading through streams or fishing on rocky riverbanks, removing the studs is best to avoid unnecessary damage. By doing so, you can extend the overall lifespan of your wading boots and ensure they remain in top condition for longer.
Can I replace the wading boot studs with different types for varied traction?
You can replace the studs on your wading boots with different types for varied traction. Many brands offer a range of studs that cater to different fishing environments.
If you find yourself fishing on rocky terrain, you might consider using harder spikes to provide better grip and stability. On the other hand, if you often fish in muddy areas, softer studs can help prevent you from slipping and sliding.
Replacing the studs is a fairly simple process that can be done at home with the right tools. It’s important to choose studs that are compatible with your wading boots and follow the manufacturer’s instructions for installation.
How often should I check the wading boot studs for wear and tear?
Inspecting the studs on your wading boots periodically is a good practice to ensure they are not worn or damaged. Regularly checking for signs of wear and tear can prevent any potential hazards while wading in the water.
If you fish in rocky or abrasive environments, it is recommended to inspect the studs after each outing. On the other hand, checking them every few trips should suffice if you fish in less demanding conditions.
Remember to pay attention to any thread damage, blunting, or excessive wear. By replacing worn studs, you can maintain optimal traction and enjoy a safer and more comfortable fishing experience.
Make Fishing More Fun by Removing Studs from Wading Boots
Removing studs from wading boots is a relatively easy task that greatly enhances your fishing experience. It is important to check the studs regularly for wear and tear, as they can become less effective over time.
Interestingly, a study conducted by fishing enthusiasts found that using studs on wading boots increased traction by an impressive 40%, allowing anglers to maneuver on slippery riverbeds confidently.
So, don’t hesitate to remove or replace studs as needed to ensure optimal traction and safety while out on the water.