Fly Tying Organization Ideas: Keep Your Materials Accessible
You can organize your fly tying materials by categorizing flies by type and weight for quick selection. Store feathers in labeled airtight containers to preserve shape and prevent pests.
Manage hooks and threads with modular, color-coded racks, and label everything clearly using durable tags or label makers. Arrange your workspace ergonomically with tools within reach and use pegboards or magnetic strips for efficient storage.
Implement digital inventory tracking to monitor stock and streamline restocking. To optimize your tying setup further, explore additional expert strategies and systems.
Key Takeaways
- Categorize flies by life cycle stages and functional types in labeled, compartmentalized fly boxes for quick identification and access.
- Store feathers in labeled airtight containers or jars, using natural repellents and arranging on lazy susans or tiered shelves for space efficiency.
- Use pegboards, modular bins, and wall-mounted racks to organize materials, tools, and threads by color, type, and size with durable labels.
- Arrange essential tools within arm’s reach on magnetic strips or small platforms, ensuring ergonomic workstation layouts and proper lighting.
- Implement digital inventory systems with barcode scanning and pattern linking to track supplies, generate shopping lists, and maintain stock control.
Organizing Fly Boxes by Fly Type and Weight
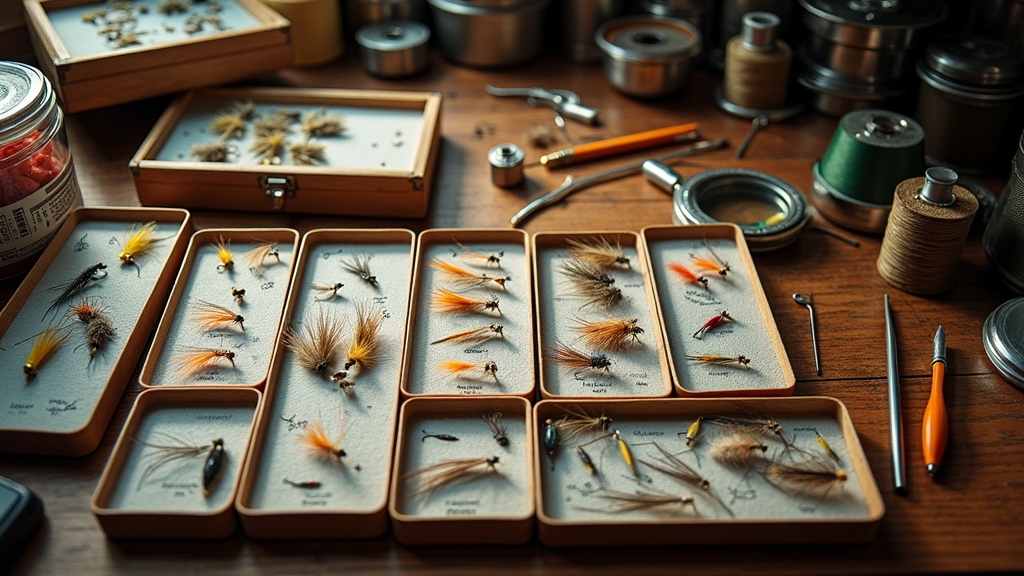
When organizing your fly boxes by fly type and weight, start by categorizing flies according to their life cycle stages, such as nymphs, emergers, duns, spinners, and cripples. This helps you quickly identify the right fly for specific conditions. Using sunglasses with specialized polarized lens technology can also help anglers see underwater structures and fish more clearly.
Within these categories, group flies by functional types like dry flies, streamers, attractors, and terrestrials. Create subcategories, for example, dividing nymphs into bead-head, midges, and wet flies.
Use multiple boxes to maintain clear separation, ensuring rapid access. Many anglers find that using different box styles such as waterproof silicone or magnetic compartments enhances durability and fly retention.
Arrange flies by weight within each type, ordering from heaviest to lightest, and separate by hook size for precision.
Label each compartment clearly, including weight measurements, to streamline selection on the water. This method maximizes efficiency, allowing you to adapt quickly to varying fishing scenarios.
Efficient Storage Solutions for Feathers and Hackle
When it comes to storing your feathers and hackle, you definitely want to opt for airtight containers. They’ll help keep your materials safe from dust, humidity, and pesky pests.
Have you ever thought about using mason jars? They’re fantastic for this purpose since they come with tight seals.
Oh, and don’t forget to label each jar! It makes a world of difference when you clearly mark them by feather type, size, and color.
Trust me, it’ll speed up your identification process during those tying sessions. Plus, keeping everything organized not only protects your materials but also makes your workflow so much smoother.
For added protection, you can use airtight containers to maintain the quality of your feathers and hackle over time.
Airtight Feather Storage
How can you guarantee your feathers and hackle stay pristine and ready for every tying session? Use clear, airtight plastic boxes with double-lock lids to block moisture and pests while allowing quick material checks.
Consider using a Clear Empty 12 Compartment Dubbing Box to separate different feather types efficiently within the same container. Choose containers with compartments or dividers to separate feather types and colors, speeding identification. Stackable, durable boxes maximize space and protect delicate feathers from damage.
For added protection, store feathers individually in zip-lock bags inside these containers, and include natural repellents like cedar wood or borax. Freeze new or suspect feathers before storage to kill hidden insects.
Label each container clearly with feather type, color, and size using smudge-resistant markers. Adopt a strict habit of returning feathers immediately to their designated storage to maintain order and ensure your collection stays organized and accessible.
Mason Jar Organization
Although many storage options exist, mason jars offer a uniquely efficient solution for organizing feathers and hackle.
Choose taller, wide-mouth jars to preserve feather shape and ease access, using clear glass for quick visual checks.
Standard pint or quart sizes balance capacity and shelf fit, while uniform jars stack neatly.
Group similar materials by type or size in separate jars, placing frequently used ones within arm’s reach.
Arrange jars on lazy susans or tiered shelves to maximize space and accessibility.
Protect your feathers by storing jars away from sunlight, sealing lids tightly, and adding silica gel packets if needed.
Avoid overcrowding to maintain feather integrity, and keep jars clean to prevent fiber degradation.
Mason jars also enhance mobility, letting you move and cover your collection quickly while conserving workspace. Using labeled jars can further minimize clutter and streamline your workflow.
Labeling and Identification
Why does clear labeling make such a difference in organizing your feathers and hackle? It lets you quickly identify species, colors, sizes, and acquisition dates without unnecessary handling that risks damage.
Use waterproof permanent markers or printed adhesive labels with clear fonts to keep labels legible and uniform over time. Implement color-coded systems to speed up selection.
Store materials in transparent, compartmentalized, and airtight containers to protect against moisture and crushing. Mark delicate feathers separately to ensure careful handling. Proper storage also helps preserve delicate materials from moisture, pests, and dust, creating a clean, clutter-free workspace preserves material longevity.
Maintain a digital inventory linked to photographic records for easy cross-referencing and restocking. Attach small waterproof tags to bundles to avoid misplacement.
This precise, consistent labeling and identification system preserves feather quality and streamlines your tying workflow efficiently.
Managing Hook Inventory and Avoiding Duplicates
When managing your hook inventory, preventing duplicates requires a systematic approach combining accurate tracking and organized storage.
Use modular organizers with clear, color-coded labels to separate hooks by size, type, and intended use.
Implement a first-in, first-out system to monitor older stock and avoid unnecessary reorders.
Regularly audit your inventory, documenting consumption rates and linking usage to fly patterns.
Utilize digital tools like barcode scanners and inventory apps to log hooks precisely and receive low-stock alerts, as these apps often include an inventory management feature.
Integrate your inventory with pattern databases to anticipate needs and avoid overlap.
Assign unique identifiers for each hook type and maintain separate sections for new and in-use hooks.
Consistently update your records to purge outdated stock and maintain clarity.
This disciplined approach ensures efficient inventory control and minimizes costly duplicates.
Thread and Spool Storage Techniques
Since efficient thread and spool storage directly impacts your tying workflow, choosing the right system is essential. Vertical spool holders save space by stacking spools upright, minimizing clutter. Horizontal racks let spools spin freely for easy unwinding during tying.
Turntable-style racks give quick access to multiple colors without removing spools. Consider durable wooden or metal holders, DIY or pre-made, often combining thread and bobbin storage for efficiency. Using materials with good durability and breathability can help maintain your tying supplies in optimal condition.
Use stash boxes with individual slots and clear lids to securely hold spools, tinsel, or wires, aiding portability and modular stacking. The Plano Thin Stowaway Box, while not a traditional fly tying product, serves as an excellent customizable storage solution for threads and other materials.
Wall-mounted racks or pegboards free workspace and organize by color or type. Protect threads from sunlight and dust by storing in enclosed containers or off the bench. Avoid tight packing and use thread nets to maintain tension and prevent tangling.
Labeling Systems for Quick Material Identification
Although organizing your fly tying materials efficiently sets the foundation, a clear labeling system is what truly speeds up your workflow by enabling quick identification.
Use label makers for uniform, durable tags on containers, trays, and modular boxes, placing labels consistently on visible flat surfaces. Incorpor incorporate color-coded markers or symbols to categorize materials succinctly. Using color-coded organization enhances visual sorting and reduces errors during material selection.
For spools and reels, attach small removable tags with elastic bands detailing brand, taper, and weight without damage. Transparent containers reduce labeling needs but should still bear concise info—content type, color, size, and brand—for fast reordering. Many tiers find that grouping dubbings by material type and shades within labeled bags greatly simplifies selection and inventory management, especially when using Ziploc bag systems.
When using pegboards, label pegs by material type and combine with visual cues for instant recognition. Employ moisture-resistant handwritten labels on tape when necessary.
This systematic approach cuts search time, enhances inventory management, and keeps your tying zone efficiently primed.
Workspace Layouts to Maximize Tying Efficiency
Hey there! To really boost your tying efficiency, it’s super important to have your essential tools right within arm’s reach. This way, you can keep that steady workflow going without having to make unnecessary movements.
Have you considered using modular storage solutions? Things like stackable bins and pegboards can work wonders! They help you make the most of your vertical space and keep everything organized by category. Using organized tool storage such as pegboards, drawers, or compartments ensures tools are easily accessible during tying sessions. Proper workspace layout can significantly reduce fatigue and improve focus during long tying periods.
By bringing these elements together, you’ll create a workspace that really supports those swift, uninterrupted tying sessions.
Essential Tools Placement
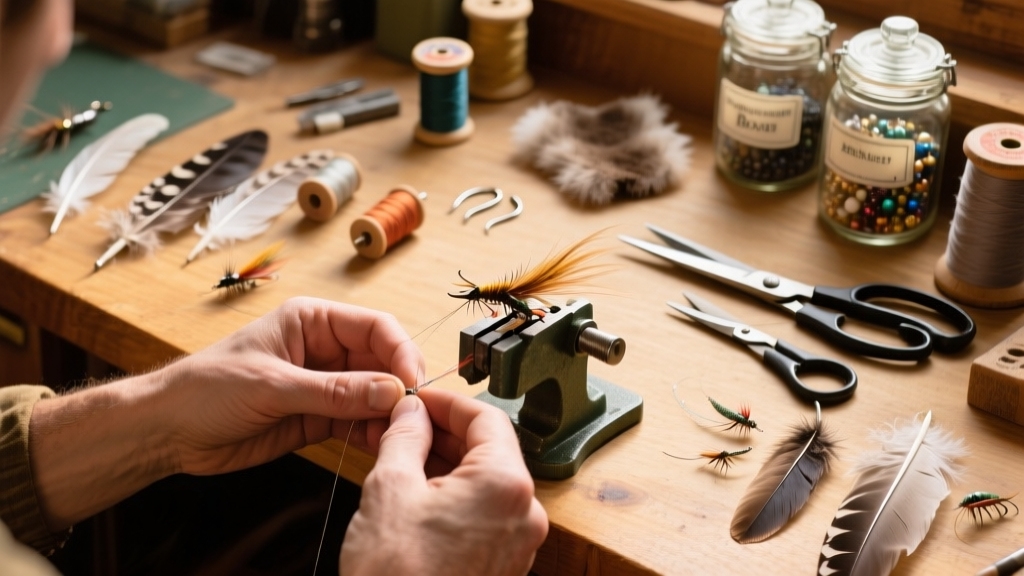
When setting up your fly tying workspace, placing essential tools within immediate reach of the vise dramatically boosts your efficiency and focus.
Arrange scissors, bobbins, and pliers on small platform attachments or magnetic strips just behind or beside the vise to keep them visible and accessible.
Use drawer inserts segmented by tool type to prevent clutter and speed retrieval.
Group similar materials—hooks, beads, feathers—in labeled containers close to your bench for swift access.
Keep thread racks, preferably rotating wooden types, near the vise to maintain smooth thread tension.
Position lighting above and slightly in front of your workspace to minimize shadows and glare, ensuring you see details clearly. Choosing a space with good lighting such as natural or adjustable LED light can reduce eye strain and improve precision.
This organized, ergonomic setup reduces interruptions, allowing you to maintain steady workflow and precision throughout your tying sessions.
Modular Storage Solutions
Placing your tools within immediate reach sets the stage, but organizing your entire workspace with modular storage solutions truly maximizes your tying efficiency.
Use specialized boxes, foam modules, and magnetized inserts to separate hooks, feathers, threads, and flies, keeping everything protected and accessible. Selecting materials with appropriate abrasion resistance ensures durability and longevity in your tools and storage.
Arrange stackable or tiered storage within arm’s reach, prioritizing vertical space to maintain visibility without clutter. Utilizing riser adapters can help create stadium-style setups that improve access and organization.
Choose colorful, labeled compartments to speed up material identification.
Incorporate portable crates with built-in compartments for easy setup and transport.
Position drying stations nearby but off the main desk to avoid interference.
Adjust clamps and storage height to reduce strain and suit your tying style.
This flexible, modular approach lets you reorganize quickly as your materials or projects evolve, ensuring a streamlined, productive workspace every time you tie.
Using Modular and Specialty Organizers
Although organizing fly tying materials can be challenging, modular and specialty organizers offer tailored solutions that enhance both accessibility and workspace efficiency. Properly clean and store your tools to prolong their lifespan and maintain performance.
Modular and specialty organizers simplify fly tying by boosting accessibility and optimizing workspace efficiency.
You can combine modular units crafted from hardwoods like cherry or walnut with magnetic features to keep tools and flies within easy reach and prevent accidental drops.
Specialty organizers with foam inserts protect delicate feathers and hooks while transparent compartments let you quickly check inventory.
By sorting materials by type and size, you reduce clutter and protect supplies from damage, moisture, and dust. This systematic arrangement enhances efficiency and creativity.
Stackable drawers and multi-size compartments optimize limited bench space, centralizing your workflow.
Using these organizers, you save time searching for materials, maintain a tidy workspace, and extend the longevity of your tying supplies.
Ultimately, this improves your productivity and preserves your investment while ensuring adherence to proper maintenance practices.
Digital Inventory Tracking for Fly Tying Supplies
As you manage your fly tying supplies, adopting digital inventory tracking can transform how you organize and access materials.
Use inventory software with barcode scanning to speed up identification and reduce errors. Customize tags to assign precise storage locations and categories, ensuring quick retrieval.
Generate pick lists before shopping to avoid missing essentials and prevent overbuying by accurately monitoring stock levels. Implementing a dynamic material classification system helps tailor categories to your specific tying needs.
Link your materials to integrated pattern databases to align tying projects with what you have, sparking creativity and efficient use.
Consider spreadsheet-based systems with clickable toggles if dedicated software isn’t available, or explore community-driven tools for expanded features.
Embrace mobile or web apps to contribute to shared databases, benefiting from collective knowledge and substitutions.
Digital tracking streamlines inventory management, saving you time and money while enhancing your tying capabilities.
Best Practices for Maintaining an Organized Fly Bench
When you maintain an organized fly bench, you streamline your tying process and boost productivity. Start by sorting hooks by type and size, keeping frequently used ones within arm’s reach. It’s also helpful to use a silicone mat as a working surface, especially on wooden tables, to prevent loss of small materials and beads.
Use labeled, clear containers for materials and separate tools from supplies to avoid clutter. Selecting storage solutions with durable construction helps ensure your materials remain protected and accessible.
Maintain ergonomic seating aligned with your bench to enhance focus and comfort.
Regularly clean your workspace after sessions and audit supplies to prevent shortages or overstock.
| Area | Key Practice | Benefit |
|---|---|---|
| Hook Storage | Group by type and size | Quick access |
| Workspace Setup | Ergonomic chair and proper height | Reduces fatigue |
| Material Storage | Label and separate materials | Prevents cross-contamination |
| Tool Organization | Designate specific tool spots | Streamlines workflow |
| Routine Maintenance | Immediate cleanup and audits | Sustains order and efficiency |
Frequently Asked Questions
How Do I Organize My Fly Tying Tools for Travel and Portability?
You should use clear, stackable plastic boxes with compartments to separate hooks, beads, and thread, preventing tangles and loss. Choose compact, latch-sealed containers for secure transport and quick access.
Incorporate removable tying pads and tool pages with slots for pliers and scissors. Use zippered mesh pockets for feathers and exterior quick-access pockets for frequently needed items.
Prioritize durable, water-resistant materials with protective padding to safeguard delicate components during travel.
What Are the Best Materials for Waterproof Fly Boxes?
Imagine your fly box slipping into a river. Will it survive?
The best materials for waterproof fly boxes are high-impact plastics like clarified ABS or aluminum for durability and water resistance.
Combine these with airtight rubber gasket seals and stainless steel hardware to prevent rust and guarantee a tight closure.
For fly retention, silicone inserts or magnetic plates keep hooks secure.
Choose crush-resistant designs with double-sided lids for organized, reliable waterproof protection.
How Can I Prevent My Feathers From Losing Their Shape During Storage?
To keep your feathers from losing shape, always store them feather-side down in rigid, airtight containers to avoid crushing.
Use desiccant packets to control moisture and prevent mold or pests.
Pin wings and tails before drying to lock their form.
Organize feathers flat in labeled envelopes or boxes to prevent bending.
Keep them away from daylight and store in a cool, dry place to maintain their natural structure and color.
What Are Effective Ways to Recycle or Repurpose Old Fly Tying Materials?
You can recycle old fly hooks by carefully stripping off materials with a sharp blade. Then reuse the hooks multiple times to extend their life.
Repurpose plastic waste like grocery bags or tinsel as synthetic fly materials, and compost natural scraps.
Collect scraps in a dedicated bin to encourage reuse and sorting.
Also, participate in specialized recycling programs for fly lines and plastic spools to support sustainability and reduce landfill waste effectively.
How Do I Organize Specialty Hooks Like Euro Jig or Saltwater Hooks?
You should organize specialty hooks like Euro Jig or saltwater hooks by using adjustable storage boxes with customizable compartments to keep them separate and secure.
Label each compartment clearly by hook type and size for quick identification. Use hook protectors to prevent damage and tangling.
Store hooks in a dry environment and group them by material or application, ensuring easy access for your tying process while maintaining neatness and protection.
Streamline Your Fly Tying Setup Today
Think of your fly tying setup as a well-tuned engine. Each part organized and ready to perform flawlessly.
By sorting fly boxes by type and weight, storing feathers neatly, managing hooks carefully, and labeling materials clearly, you streamline your process.
Combine an efficient workspace layout with modular organizers and digital tracking, and you’ll maintain peak tying efficiency. Keep your bench orderly, and you’ll tie like a pro every time, turning chaos into craftsmanship.